作者:Adam Freeman 翻译:陈广 日期:2018-9-4
本章中我将继续构建运动商店应用程序,为站点管理员提供一种管理订单和产品的方法
在上一章中,我增加了对接收客户订单并将其存储在数据库中的支持。本章我将创建一个简单的管理工具,允许我查看已收到的订单并将其标记为已发送的订单。
我需要做的第一个改变是增强模型,以便能够记录哪些订单已经发货。清单11-1显示了在Order类中添加一个新属性,该属性是在 Model 文件夹中的 Order.cs 文件中定义的。
清单 11-1:Models 文件夹下的 Order.cs 文件,添加属性
using System.Collections.Generic;
using System.ComponentModel.DataAnnotations;
using Microsoft.AspNetCore.Mvc.ModelBinding;

namespace SportsStore.Models
{
    public class Order
    {
        [BindNever]
        public int OrderID { get; set; }

        [BindNever]
        public ICollection<CartLine> Lines { get; set; }

        [BindNever]
        public bool Shipped { get; set; }

        [Required(ErrorMessage = "Please enter a name")]
        public string Name { get; set; }

        [Required(ErrorMessage = "Please enter the first address line")]
        public string Line1 { get; set; }

        public string Line2 { get; set; }
        public string Line3 { get; set; }

        [Required(ErrorMessage = "Please enter a city name")]
        public string City { get; set; }

        [Required(ErrorMessage = "Please enter a state name")]
        public string State { get; set; }

        public string Zip { get; set; }

        [Required(ErrorMessage = "Please enter a country name")]
        public string Country { get; set; }

        public bool GiftWrap { get; set; }
    }
}
这种扩展和调整模型以支持不同功能的迭代方法是 MVC 开发的典型。在理想的世界中,您可以在项目开始时完整地定义模型类,并围绕它们构建应用程序,但这只发生在最简单的项目中,而在实践中,迭代开发是随着对开发和进化的需求的理解而被使用的。
Entity Framework Core 迁移使这一过程更容易,因为您不必通过编写自己的 SQL 命令手动将数据库架构与模型类保持同步。若要更新数据库以反映Order类中添加了Shipped属性,请打开一个新的命令提示符或 PowerShell 窗口,导航到 SportsStore 项目文件夹(该文件夹包含 Startup.cs 文件)并运行以下命令:
dotnet ef migrations add ShippedOrders
迁移将在应用程序启动时自动应用,SeedData类将调用 Entity Framework Core 提供的迁移方法。
显示和更新数据库中的订单集所需的功能相对简单,因为它建立在上一章创建的功能和基础结构上。在清单11-2中,我向Order控制器添加了两个新的 action 方法。
清单 11-2:Controllers 文件夹下的 OrderController.cs 文件,添加 Action 方法
using Microsoft.AspNetCore.Mvc;
using SportsStore.Models;
using System.Linq;
namespace SportsStore.Controllers
{
    public class OrderController : Controller
    {
        private IOrderRepository repository;
        private Cart cart;

        public OrderController(IOrderRepository repoService, Cart cartService)
        {
            repository = repoService;
            cart = cartService;
        }

        public ViewResult List() =>
            View(repository.Orders.Where(o => !o.Shipped));

        [HttpPost]
        public IActionResult MarkShipped(int orderID)
        {
            Order order = repository.Orders
            .FirstOrDefault(o => o.OrderID == orderID);
            if (order != null)
            {
                order.Shipped = true;
                repository.SaveOrder(order);
            }
            return RedirectToAction(nameof(List));
        }

        public ViewResult Checkout() => View(new Order());

        [HttpPost]
        public IActionResult Checkout(Order order)
        {
            if (cart.Lines.Count() == 0)
            {
                ModelState.AddModelError("", "Sorry, your cart is empty!");
            }
            if (ModelState.IsValid)
            {
                order.Lines = cart.Lines.ToArray();
                repository.SaveOrder(order);
                return RedirectToAction(nameof(Completed));
            }
            else
            {
                return View(order);
            }
        }
        public ViewResult Completed()
        {
            cart.Clear();
            return View();
        }
    }
}
List方法选择存储库中所有Shipped值为false的Order对象,并将其传递到默认视图。这是我将使用的 action 方法,用于向管理员显示未发送订单的列表。
MarkShipped方法将接收一个 POST 请求,该请求指定订单的 ID,该 ID 用于从存储库中定位相应的Order对象,以便可以将Shipped属性设置为true并保存。
为了显示未发货订单的列表,我在 Views/Order 文件夹中添加了一个名为 List.cshtml 的 Razor 视图文件,并添加了清单11-3所示的标记。
清单 11-3:Views/Order 文件夹下的 List.cshtml 文件的内容
@model IEnumerable<Order>

@{
    ViewBag.Title = "Orders";
    Layout = "_AdminLayout";
}

@if (Model.Count() > 0)
{
    <table class="table table-bordered table-striped">
        <tr><th>Name</th><th>Zip</th><th colspan="2">Details</th><th></th></tr>
        @foreach (Order o in Model)
        {
            <tr>
                <td>@o.Name</td>
                <td>@o.Zip</td>
                <th>Product</th>
                <th>Quantity</th>
                <td>
                    <form asp-action="MarkShipped" method="post">
                        <input type="hidden" name="orderId" value="@o.OrderID" />
                        <button type="submit" class="btn btn-sm btn-danger">
                            Ship
                        </button>
                    </form>
                </td>
            </tr>
            @foreach (CartLine line in o.Lines)
            {
                <tr>
                    <td colspan="2"></td>
                    <td>@line.Product.Name</td>
                    <td>@line.Quantity</td>
                    <td></td>
                </tr>
            }
        }
    </table>
}
else
{
    <div class="text-center">No Unshipped Orders</div>
}
每个订单都有一个【Ship】按钮,该按钮将表单提交给MarkShipped action 方法。我使用Layout属性为 List 视图指定了不同的布局,该属性覆盖 _ViewStart.cshtml 文件中指定的布局。
为了添加布局,我使用【Razor 布局】模板在 Views/Shared 文件夹中创建一个名为 _AdminLayout.cshtml 的文件,并添加了清单11-4所示的标记。
清单 11-4:Views/Shared 文件夹下的 _AdminLayout.cshtml 文件的内容
<!DOCTYPE html>
<html>
<head>
    <meta name="viewport" content="width=device-width" />
    <link rel="stylesheet" asp-href-include="lib/bootstrap/css/*.min.css" />
    <title>@ViewBag.Title</title>
</head>
<body class="m-1 p-1">
    <div class="bg-info p-2"><h4>@ViewBag.Title</h4></div>
    @RenderBody()
</body>
</html>
要查看和管理应用程序中的订单,启动应用程序,选择一些产品,然后结账。接下来导航到 /Order/List URL,您将看到您创建的订单的摘要,如图11-1所示。单击【Ship】按钮;数据库将被更新,挂起的订单列表将被清空。
注意:目前,没有什么可以阻止客户请求 /Order/List URL 并管理他们自己的订单。我在第12章中解释了如何限制对 action 方法的访问。
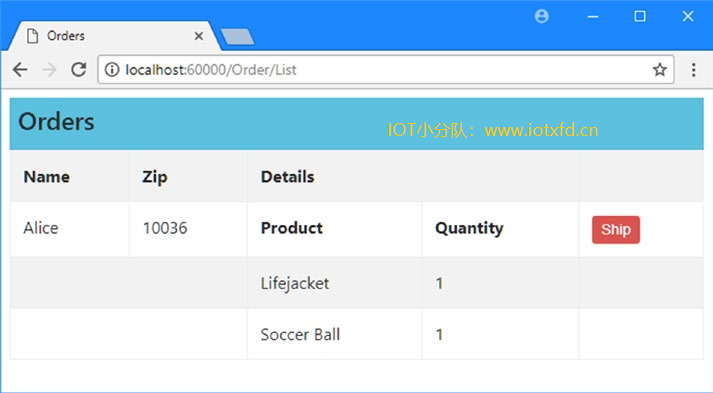 图11-1 管理订单
管理更复杂的项集合的约定是向用户呈现两种类型的页面:列表页和编辑页,如图11-2所示。
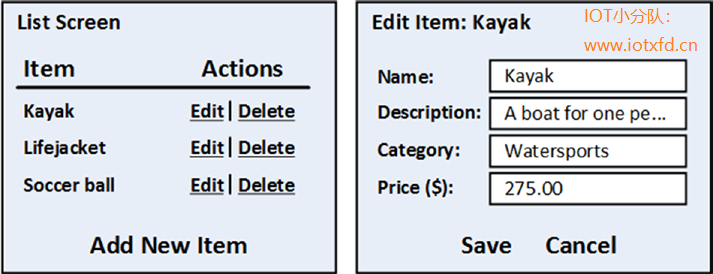 图11-2 产品类别的 CRUD UI 草图
这些页面允许用户创建、读取、更新和删除集合中的项目。这些操作统称为 CRUD(create, read, update, delete)。开发人员需要经常实现 CRUD,以至于 Visual Studio 脚手架包含了使用预定义的 action 方法创建 CRUD 控制器的脚本(我在第8章中解释了如何启用脚手架功能)。但是和我对所有 Visual Studio 模板的态度一样,我认为学习如何直接使用 ASP.NET Core MVC 的特性更好。
首先,我将创建一个单独的控制器,用于管理产品目录。我在 Controllers 文件夹中添加了一个名为 AdminController.cs 的类文件,并添加了清单11-5所示的代码。 清单 11-5:Controllers 文件夹下的 AdminController.cs 文件的内容
using Microsoft.AspNetCore.Mvc;
using SportsStore.Models;

namespace SportsStore.Controllers
{
    public class AdminController : Controller
    {
        private IProductRepository repository;
        public AdminController(IProductRepository repo)
        {
            repository = repo;
        }
        public ViewResult Index() => View(repository.Products);
    }
}
控制器的构造器声明依赖于IProductRepository接口,在创建实例时将被解析。控制器定义一个 action 方法Index,该方法调用View方法来选择 action 的默认视图,并将数据库中的产品集作为视图模型传递。
单元测试:Index action
对于 Admin 控制器的
Index方法,我所关心的是它能正确地返回存储库中的产品对象。我可以通过创建模拟存储库实现并将测试数据与 action 方法返回的数据进行比较来测试这一点。下面是单元测试,我把它放在了一个新的单元测试文件中,这个文件名为 AdminControllerTests.cs,位于 SportsStore.Tests 项目中:
using System.Collections.Generic;
using System.Linq;
using Microsoft.AspNetCore.Mvc;
using Moq;
using SportsStore.Controllers;
using SportsStore.Models;
using Xunit;
namespace SportsStore.Tests
{
    public class AdminControllerTests
    {
        [Fact]
        public void Index_Contains_All_Products()
        {
            // Arrange - create the mock repository
            Mock<IProductRepository> mock = new Mock<IProductRepository>();
            mock.Setup(m => m.Products).Returns(new Product[] {
                new Product {ProductID = 1, Name = "P1"},
                new Product {ProductID = 2, Name = "P2"},
                new Product {ProductID = 3, Name = "P3"},
            }.AsQueryable<Product>());
            // Arrange - create a controller
            AdminController target = new AdminController(mock.Object);

            // Action
            Product[] result
                = GetViewModel<IEnumerable<Product>>(target.Index())?.ToArray();

            // Assert
            Assert.Equal(3, result.Length);
            Assert.Equal("P1", result[0].Name);
            Assert.Equal("P2", result[1].Name);
            Assert.Equal("P3", result[2].Name);
        }
        private T GetViewModel<T>(IActionResult result) where T : class
        {
            return (result as ViewResult)?.ViewData.Model as T;
        }
    }
}
我在测试中添加了
GetViewModel方法,以取出 action 方法的结果并获得视图模型数据。我将在本章后面添加更多使用此方法的测试。
下一步是为 Admin 控制器添加Index操作方法的视图。我创建了 Views/Admin 文件夹,并添加了一个名为 Index.cshtml 的 Razor 文件,其内容如清单11-6所示。
清单 11-6:Views/Admin 文件夹下的 Index.cshtml 文件的内容
@model IEnumerable<Product>

@{
    ViewBag.Title = "All Products";
    Layout = "_AdminLayout";
}

<table class="table table-striped table-bordered table-sm">
    <tr>
        <th class="text-right">ID</th>
        <th>Name</th>
        <th class="text-right">Price</th>
        <th class="text-center">Actions</th>
    </tr>
    @foreach (var item in Model)
    {
        <tr>
            <td class="text-right">@item.ProductID</td>
            <td>@item.Name</td>
            <td class="text-right">@item.Price.ToString("c")</td>
            <td class="text-center">
                <form asp-action="Delete" method="post">
                    <a asp-action="Edit" class="btn btn-sm btn-warning"
                       asp-route-productId="@item.ProductID">
                        Edit
                    </a>
                    <input type="hidden" name="ProductID" value="@item.ProductID" />
                    <button type="submit" class="btn btn-danger btn-sm">
                        Delete
                    </button>
                </form>
            </td>
        </tr>
    }
</table>
<div class="text-center">
    <a asp-action="Create" class="btn btn-primary">Add Product</a>
</div>
此视图包含对应于每个产品都有一行的表,其中的单元格包含产品的名称、价格和按钮,这些单元格允许通过发送 Edit 和 Delete action 的请求来编辑或删除产品。除了表之外,还有一个【Add Product】按钮,针对的是Create action。我将在后面的部分中添加 Edit、Delete 和 Create action,但是您可以通过启动应用程序并请求 /Admin/Index URL 来查看产品的显示方式,如图11-3所示。
提示:【Edit】按钮位于清单11-6中的
form元素中,因此这两个按钮彼此并排,使用 Bootstrap 赋予的间距。【Edit】按钮将向服务器发送一个 HTTP GET 请求,以获取产品的当前详细信息;这并不需要form元素。但由于【delete】按钮将对应用程序状态进行更改,我需要使用 HTTP POST 请求 —— 这确实需要form元素。
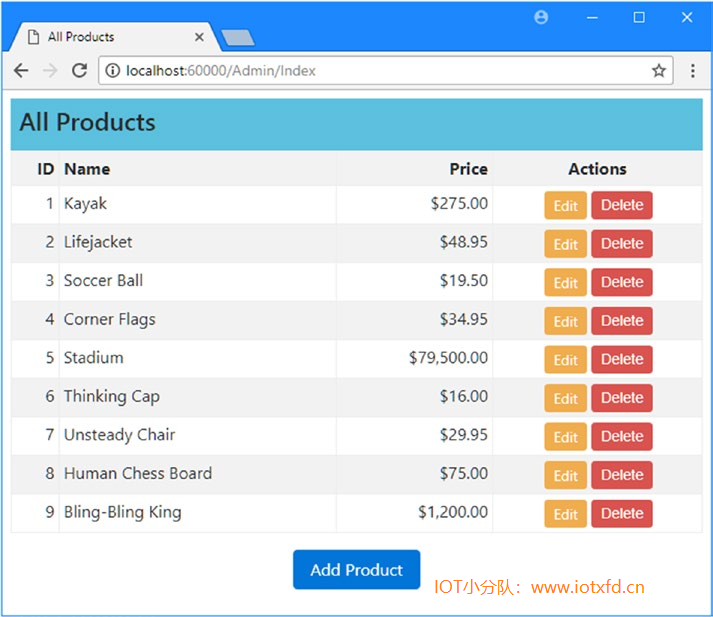 图11-3 显示产品列表
为了提供创建和更新功能,我将添加一个产品编辑页面,如图11-2所示。以下是本工作的两个部分:
清单11-7显示了我添加到 Admin 控制器中的 Edit action 方法,当用户单击编辑按钮时,它将接收浏览器发送的 HTTP 请求。
清单 11-7:Controllers 文件夹下的 AdminController.cs 文件,添加一个 Edit Aciton 方法
using Microsoft.AspNetCore.Mvc;
using SportsStore.Models;
using System.Linq;

namespace SportsStore.Controllers
{
    public class AdminController : Controller
    {
        private IProductRepository repository;
        public AdminController(IProductRepository repo)
        {
            repository = repo;
        }

        public ViewResult Index() => View(repository.Products);

        public ViewResult Edit(int productId) =>
            View(repository.Products
                .FirstOrDefault(p => p.ProductID == productId));
    }
}
这个简单的方法使用与productId参数相对应的 ID 查找产品,并将其作为视图模型对象传递给View方法。
单元测试:Edit Action 方法
我想在 Edit action 方法中测试两种行为。第一,当我提供一个有效的 ID 值以确保正在编辑我期望的产品时,得到了我所要求的产品。第二个要测试的行为是,当我请求一个不在存储库中的 ID 值时,我根本没有得到任何产品。我添加到 AdminControllerTests.cs 类文件中的测试方法:
...
[Fact]
public void Can_Edit_Product()
{
    // Arrange - create the mock repository
    Mock<IProductRepository> mock = new Mock<IProductRepository>();
    mock.Setup(m => m.Products).Returns(new Product[] {
        new Product {ProductID = 1, Name = "P1"},
        new Product {ProductID = 2, Name = "P2"},
        new Product {ProductID = 3, Name = "P3"},
    }.AsQueryable<Product>());
    // Arrange - create the controller
    AdminController target = new AdminController(mock.Object);

    // Act
    Product p1 = GetViewModel<Product>(target.Edit(1));
    Product p2 = GetViewModel<Product>(target.Edit(2));
    Product p3 = GetViewModel<Product>(target.Edit(3));

    // Assert
    Assert.Equal(1, p1.ProductID);
    Assert.Equal(2, p2.ProductID);
    Assert.Equal(3, p3.ProductID);
}
[Fact]
public void Cannot_Edit_Nonexistent_Product()
{
    // Arrange - create the mock repository
    Mock<IProductRepository> mock = new Mock<IProductRepository>();
    mock.Setup(m => m.Products).Returns(new Product[] {
        new Product {ProductID = 1, Name = "P1"},
        new Product {ProductID = 2, Name = "P2"},
        new Product {ProductID = 3, Name = "P3"},
    }.AsQueryable<Product>());

    // Arrange - create the controller
    AdminController target = new AdminController(mock.Object);

    // Act
    Product result = GetViewModel<Product>(target.Edit(4));

    // Assert
    Assert.Null(result);
}
...
现在我有了一个 action 方法,我可以为显示它创建一个视图,我在 Views/Admin 文件夹中添加了一个名为 Edit.cshtml 的 Razor 视图文件,并添加了清单11-8所示的标记。
清单 11-8:Views/Admin 文件夹下的 Edit.cshtml 文件的内容
@model Product

@{
    ViewBag.Title = "Edit Product";
    Layout = "_AdminLayout";
}

<form asp-action="Edit" method="post">
    <input type="hidden" asp-for="ProductID" />
    <div class="form-group">
        <label asp-for="Name"></label>
        <input asp-for="Name" class="form-control" />
    </div>
    <div class="form-group">
        <label asp-for="Description"></label>
<textarea asp-for="Description" class="form-control"></textarea>
    </div>
    <div class="form-group">
        <label asp-for="Category"></label>
        <input asp-for="Category" class="form-control" />
    </div>
    <div class="form-group">
        <label asp-for="Price"></label>
        <input asp-for="Price" class="form-control" />
    </div>
    <div class="text-center">
        <button class="btn btn-primary" type="submit">Save</button>
        <a asp-action="Index" class="btn btn-secondary">Cancel</a>
    </div>
</form>
该视图包含一个 HTML 表单,它使用标签助手生成大部分内容,包括设置表单和元素的目标、设置label元素的内容以及为input和textarea元素生成name、id和value属性。
通过启动应用程序、导航到 /Admin/Index URL 并单击其中一个产品的编辑按钮,您可以看到视图生成的 HTML,如图11-4所示。
提示:为简单起见,我对
ProductID属性使用了一个隐藏的input元素。当 Entity Framework Core 存储一个新对象时,数据库会生成ProductID的值作为主键,并且安全地更改它可以是一个复杂的过程。对于大多数应用程序来说,最简单的方法是防止用户更改值。
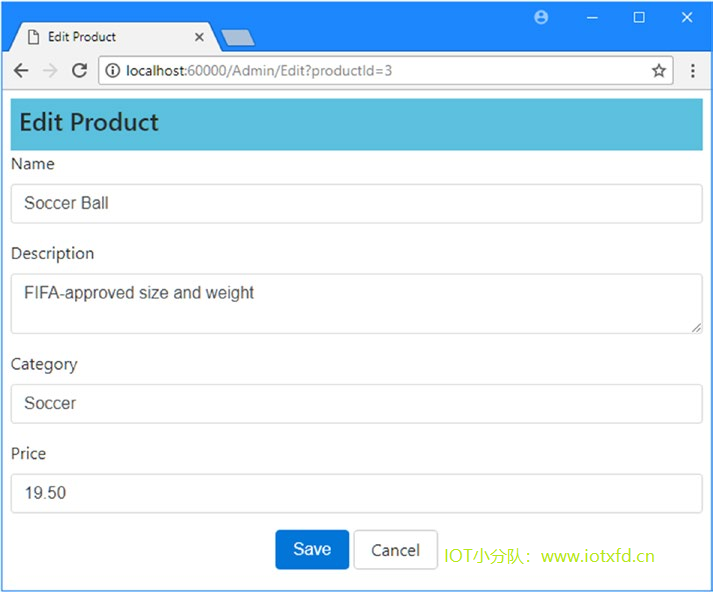 图11-4 显示用于编辑的新产品值
在处理编辑之前,我需要增强产品存储库,以便它能够保存更改。首先,我向IProductRepository接口添加了一个新方法,如清单11-9所示。
清单 11-9:Models 文件夹下的 IProductRepository.cs 文件,添加一个方法
using System.Linq;

namespace SportsStore.Models
{
    public interface IProductRepository
    {
        IQueryable<Product> Products { get; }
        void SaveProduct(Product product);
    }
}
然后,我可以将新方法添加到存储库的 Entity Framework Core 实现中,该实现在 EFProductRepository.cs 文件中定义,如清单11-10所示。
清单 11-10:Models 文件夹下的 EFProductRepository.cs 文件,实现新方法
using System.Collections.Generic;
using System.Linq;

namespace SportsStore.Models
{
    public class EFProductRepository : IProductRepository
    {
        private ApplicationDbContext context;
        public EFProductRepository(ApplicationDbContext ctx)
        {
            context = ctx;
        }
        public IQueryable<Product> Products => context.Products;

        public void SaveProduct(Product product)
        {
            if (product.ProductID == 0)
            {
                context.Products.Add(product);
            }
            else
            {
                Product dbEntry = context.Products
                    .FirstOrDefault(p => p.ProductID == product.ProductID);
                if (dbEntry != null)
                {
                    dbEntry.Name = product.Name;
                    dbEntry.Description = product.Description;
                    dbEntry.Price = product.Price;
                    dbEntry.Category = product.Category;
                }
            }
            context.SaveChanges();
        }
    }
}
当ProductID为0时,SaveChanges方法的实现将产品添加到存储库中;否则,它将对数据库中的现有条目进行更改。
我不想详细讨论 Entity Framework Core,因为正如我前面解释的,它本身是一个主题,而不是 ASP.NET Core MVC 的一部分。但是,SaveProduct方法中有一些东西对 MVC 应用程序的设计有影响。
我知道,当我接收到一个Product参数时,需要执行一个更新,该参数的ProductID不是零。为此,我从存储库中获得了一个具有相同ProductID的Product对象,并更新了每个属性,以便它们与参数对象匹配。
我可以这样做,因为 Entity Framework Core 跟踪它从数据库中创建的对象。传递给SaveChanges方法的对象是由 MVC 模型绑定功能创建的,这意味着 Entity Framework Core 对新Product对象一无所知,并且在修改时不会对数据库使用更新。解决这一问题的方法很多,我采取了最简单的方法,即定位 Entity Framework Core 知道的相应对象,并显式地更新它。
IProductRepository接口中添加的新方法更改了我在第8章中创建的伪存储库类 —— FakeProductRepository。我使用伪存储库来快速启动开发过程,并演示如何使用服务无缝地替换接口实现,而不需要修改依赖它们的组件。我不再需要伪存储库了,在清单11-11中,您可以看到我已经从类声明中删除了接口,这样我就不必在添加存储库功能时继续修改类了。
清单 11-11:Models 文件夹下的 FakeProductRepository.cs 文件,移除接口
using System.Collections.Generic;
using System.Linq;

namespace SportsStore.Models {
    public class FakeProductRepository /* : IProductRepository */ {
        public IQueryable<Product> Products => new List<Product> {
            new Product { Name = "Football", Price = 25 },
            new Product { Name = "Surf board", Price = 179 },
            new Product { Name = "Running shoes", Price = 95 }
        }.AsQueryable<Product>();
    }
}
我已经准备好在Admin控制器中实现Edit action 方法的重载,当管理员单击【Save】按钮时,它将处理POST 请求。清单11-12显示了新的 action 方法。
清单 11-12:Controllers 文件夹下的 AdminController.cs 文件,定义 Action 方法
using Microsoft.AspNetCore.Mvc;
using SportsStore.Models;
using System.Linq;

namespace SportsStore.Controllers
{
    public class AdminController : Controller
    {
        private IProductRepository repository;
        public AdminController(IProductRepository repo)
        {
            repository = repo;
        }

        public ViewResult Index() => View(repository.Products);

        public ViewResult Edit(int productId) =>
            View(repository.Products
                .FirstOrDefault(p => p.ProductID == productId));

        [HttpPost]
        public IActionResult Edit(Product product)
        {
            if (ModelState.IsValid)
            {
                repository.SaveProduct(product);
                TempData["message"] = $"{product.Name} has been saved";
                return RedirectToAction("Index");
            }
            else
            {
                // there is something wrong with the data values
                return View(product);
            }
        }
    }
}
我通过读取ModelState.IsValid属性的值,检查模型绑定过程是否能够验证用户提交的数据。如果一切正常,我将更改保存到存储库,并将用户重定向到Index action,以便他们看到修改后的产品列表。如果数据有问题,我将再次渲染默认视图,以便用户进行更正。
在存储库中保存更改后,我使用 temp data 功能存储消息,这是 ASP.NET Core 会话状态功能的一部分。它是一个 键/值 字典,类似于我先前使用的会话数据和 view bag 功能。与会话数据的主要区别是, temp data 一直保存到读取为止。
在这种情况下,我不能使用ViewBag,因为ViewBag在控制器和视图之间传递数据,并且它不能比当前的 HTTP 请求保存数据的时间更长。编辑成功后,浏览器将被重定向到一个新的 URL,此时ViewBag数据丢失了。我可以使用会话数据功能,但是消息将是持久的,直到我显式删除它,这并非我想要的。
因此 temp data 功能是非常合适的。数据仅限于单个用户的会话(这样用户就不会看到对方的 temp data),并且会持续足够长的时间让我阅读它。我将为已经重定向的用户读取由 action 方法渲染的视图中的数据,并在下一章中定义它们。
单元测试:提交编辑
对于处理 POST 的
Editaction 方法,我需要确保将作为方法参数接收的对Product对象的有效更新传递到产品存储库以保存。我还想检查无效的更新(如果存在模型验证错误)不会传递给存储库。下面是我添加到 AdminControllerTests.cs 文件中的测试方法:
...
[Fact]
public void Can_Save_Valid_Changes()
{
    // Arrange - create mock repository
    Mock<IProductRepository> mock = new Mock<IProductRepository>();
    // Arrange - create mock temp data
    Mock<ITempDataDictionary> tempData = new Mock<ITempDataDictionary>();
    // Arrange - create the controller
    AdminController target = new AdminController(mock.Object)
    {
        TempData = tempData.Object
    };
    // Arrange - create a product
    Product product = new Product { Name = "Test" };

    // Act - try to save the product
    IActionResult result = target.Edit(product);

    // Assert - check that the repository was called
    mock.Verify(m => m.SaveProduct(product));
    // Assert - check the result type is a redirection
    Assert.IsType<RedirectToActionResult>(result);
    Assert.Equal("Index", (result as RedirectToActionResult).ActionName);
}

[Fact]
public void Cannot_Save_Invalid_Changes()
{
    // Arrange - create mock repository
    Mock<IProductRepository> mock = new Mock<IProductRepository>();
    // Arrange - create the controller
    AdminController target = new AdminController(mock.Object);
    // Arrange - create a product
    Product product = new Product { Name = "Test" };
    // Arrange - add an error to the model state
    target.ModelState.AddModelError("error", "error");

    // Act - try to save the product
    IActionResult result = target.Edit(product);

    // Assert - check that the repository was not called
    mock.Verify(m => m.SaveProduct(It.IsAny<Product>()), Times.Never());
    // Assert - check the method result type
    Assert.IsType<ViewResult>(result);
}
...
译者注:应加入命名空间:
using Microsoft.AspNetCore.Mvc.ViewFeatures;
否则无法识别ITempDataDictionary。
我将处理 _AdminLayout.cshtml 布局文件中使用TempData存储的消息,如清单11-13所示。通过处理模板中的消息,我可以在任何使用模板的视图中创建消息,而无需创建额外的 Razor 表达式。
清单 11-13:_AdminLayout.cshtml 文件,处理 ViewBag 消息
<!DOCTYPE html>
<html>
<head>
    <meta name="viewport" content="width=device-width" />
    <link rel="stylesheet" asp-href-include="lib/bootstrap/css/*.min.css" />
    <title>@ViewBag.Title</title>
</head>
<body class="m-1 p-1">
    <div class="bg-info p-2"><h4>@ViewBag.Title</h4></div>
    @if (TempData["message"] != null)
    {
        <div class="alert alert-success">@TempData["message"]</div>
    }
    @RenderBody()
</body>
</html>
提示:像这样处理模板中消息的好处是,用户在保存了更改之后,将在渲染的任何页面上看到它。目前,我将它们返回到产品列表中,但是我可以更改工作流以渲染其他视图,并且用户仍然会看到消息(只要下一个视图也使用相同的布局)。
现在,我已经准备好了编辑产品的所有部分。要查看它是如何工作的,启动应用程序,导航到 /Admin/Index URL,单击【Edit】按钮,然后进行更改。单击【Save】按钮。您将被重定向到 /Admin/Index URL,并显示TempData消息,如图11-5所示。如果重新加载产品列表屏幕,消息将消失,因为在读取时将删除TempData。这很方便,因为我不想让旧消息到处流传。
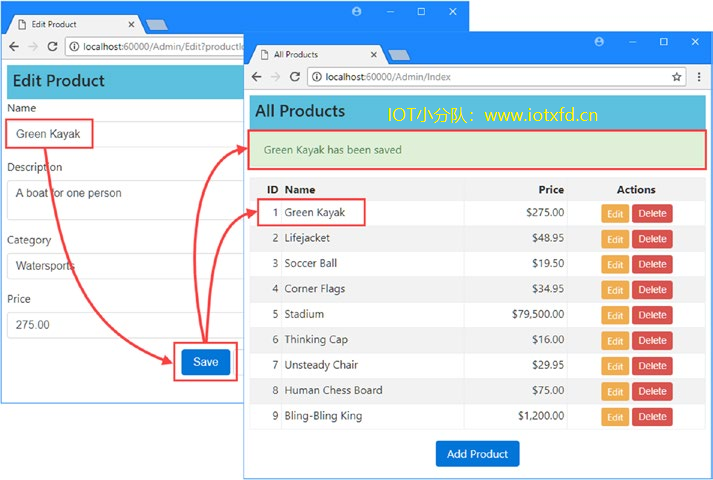 图11-5 编辑产品并查看 TempData 消息
我已经到了需要向模型类添加验证规则的地步了。目前,管理员可以输入负数的价格或空白的描述,而运动商店会很乐意将这些数据存储在数据库中。脏数据能否成功存储取决于它是否符合 Entity Framework Core 创建的 SQL 表中的约束,这种保护对于大多数应用程序来说都不够。为了防止错误的数据值,我用特性修饰了Product类的属性,如清单11-14所示,就像我在第10章中对Order类所做的那样。
清单 11-14:Models 文件夹下的 Product.cs 文件,应用验证特性
using System.ComponentModel.DataAnnotations;
using Microsoft.AspNetCore.Mvc.ModelBinding;

namespace SportsStore.Models
{
    public class Product
    {
        public int ProductID { get; set; }

        [Required(ErrorMessage = "Please enter a product name")]
        public string Name { get; set; }

        [Required(ErrorMessage = "Please enter a description")]
        public string Description { get; set; }

        [Required]
        [Range(0.01, double.MaxValue,
        ErrorMessage = "Please enter a positive price")]
        public decimal Price { get; set; }

        [Required(ErrorMessage = "Please specify a category")]
        public string Category { get; set; }
    }
}
在第10章,我使用了标签助手在窗口顶部显示验证错误的摘要。对于本例,我将使用类似的方法,但我将在 Edit 视图中的单个表单元素旁边显示错误消息,如清单11-15所示。
清单 11-15:Views/Admin 文件夹下的 Edit.cshtml 文件,添加验证错误元素
@model Product

@{
    ViewBag.Title = "Edit Product";
    Layout = "_AdminLayout";
}

<form asp-action="Edit" method="post">
    <input type="hidden" asp-for="ProductID" />
    <div class="form-group">
        <label asp-for="Name"></label>
        <div><span asp-validation-for="Name" class="text-danger"></span></div>
        <input asp-for="Name" class="form-control" />
    </div>
    <div class="form-group">
        <label asp-for="Description"></label>
        <div><span asp-validation-for="Description" class="text-danger"></span></div>
        <textarea asp-for="Description" class="form-control"></textarea>
    </div>
    <div class="form-group">
        <label asp-for="Category"></label>
        <div><span asp-validation-for="Category" class="text-danger"></span></div>
        <input asp-for="Category" class="form-control" />
    </div>
    <div class="form-group">
        <label asp-for="Price"></label>
        <div><span asp-validation-for="Price" class="text-danger"></span></div>
        <input asp-for="Price" class="form-control" />
    </div>
    <div class="text-center">
        <button class="btn btn-primary" type="submit">Save</button>
        <a asp-action="Index" class="btn btn-secondary">Cancel</a>
    </div>
</form>
在asp-validation-for属性应用于span元素时,如果存在任何验证问题,将通过标签助手为指定属性添加验证错误消息。
标签助手将在span元素中插入一个错误消息,并将该元素添加到input-validation-error类中,这使得将 CSS 样式应用于错误消息元素变得很容易,如清单11-16所示。
清单 11-16:Views/Shared 文件夹下的 _AdminLayout.cshtml 文件,添加 CSS
<!DOCTYPE html>
<html>
<head>
    <meta name="viewport" content="width=device-width" />
    <link rel="stylesheet" asp-href-include="lib/bootstrap/css/*.min.css" />
    <title>@ViewBag.Title</title>
    <style>
        .input-validation-error {
            border-color: red;
            background-color: #fee;
        }
    </style>
</head>
<body class="m-1 p-1">
    <div class="bg-info p-2"><h4>@ViewBag.Title</h4></div>
    @if (TempData["message"] != null)
    {
        <div class="alert alert-success">@TempData["message"]</div>
    }
    @RenderBody()
</body>
</html>
我定义的 CSS 样式选择input-validation-error类的成员元素,并应用红色边框和背景色。
提示:当使用像 Bootstrap 这样的 CSS 库时,显式设置样式可能会在应用内容主题时引起不一致。在第27章中,我将介绍一种使用 JavaScript 代码将 Bootstrap 类应用于存在验证错误的元素的替代方法,它使所有内容保持一致,但也更加复杂。
您可以在视图中的任何地方使用验证消息标签助手,将其放置在问题元素附近为用户提供一些内容是常规作法(也是明智的)。图11-6显示了显示的验证消息和提示,您可以通过运行应用程序、编辑产品和提交无效数据来查看这些消息和提示。
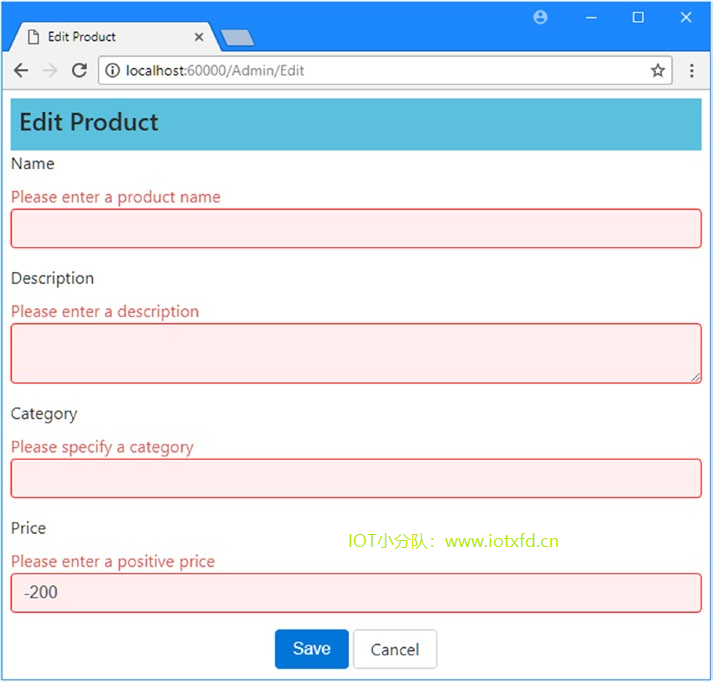 图11-6 编辑产品时的数据验证
目前,只有当管理员用户向服务器提交编辑时,才会应用数据验证,但大多数用户希望在输入的数据出现问题时立即进行反馈。这就是开发人员经常希望执行客户端验证的原因,在这里,数据是使用 JavaScript 在浏览器中签入的。MVC 应用程序可以根据我应用到域模型类的数据标注执行客户端验证。
第一步是将提供客户端功能的 JavaScript 库添加到应用程序中,请在【解决方案资源管理器】中右键点击项目,在弹出菜单中选择【添加】➤【添加客户端库】以打开 LibMan,并在其中加入“jquery”、“jquery-validate”、“jquery-validation-unobtrusive” 三个库。最终,libman.json 文件显示的内容如下:
清单 11-17:libman.json 文件,添加 JavaScript 包
{
  "version": "1.0",
  "defaultProvider": "cdnjs",
  "libraries": [
    {
      "library": "twitter-bootstrap@4.1.3",
      "destination": "wwwroot/lib/twitter-bootstrap/"
    },
    {
      "library": "jquery@3.3.1",
      "destination": "wwwroot/lib/jquery/"
    },
    {
      "library": "jquery-validate@1.17.0",
      "destination": "wwwroot/lib/jquery-validate/"
    },
    {
      "library": "jquery-validation-unobtrusive@3.2.10",
      "destination": "wwwroot/lib/jquery-validation-unobtrusive/"
    }
  ]
}
客户端验证是建立在流行的 jQuery 库之上的,它简化了浏览器的 DOM API 的工作。下一步是将 JavaScript 文件添加到布局中,以便在使用 SportsStore 管理功能时加载它们,如清单11-18所示。
清单 11-18:Views/Shared 文件夹下的 _AdminLayout.cshtml 文件,添加验证库
<!DOCTYPE html>
<html>
<head>
    <meta name="viewport" content="width=device-width" />
    <link rel="stylesheet" asp-href-include="lib/bootstrap/css/*.min.css" />
    <title>@ViewBag.Title</title>
    <style>
        .input-validation-error {
            border-color: red;
            background-color: #fee;
        }
    </style>
    <script src="/lib/jquery/jquery.min.js"></script>
    <script src="/lib/jquery-validate/jquery.validate.min.js"></script>
    <script src="/lib/jquery-validation-unobtrusive/jquery.validate.unobtrusive.min.js"></script>
</head>
<body class="m-1 p-1">
    <div class="bg-info p-2"><h4>@ViewBag.Title</h4></div>
    @if (TempData["message"] != null)
    {
        <div class="alert alert-success">@TempData["message"]</div>
    }
    @RenderBody()
</body>
</html>
启用客户端验证不会引起任何视觉更改,但是,应用于 C# 模型类的特性所指定的约束在浏览器中执行,防止用户提交带有脏数据的表单,并在出现问题时立即提供反馈。有关详细信息,请参阅第27章。
接下来,我将实现Create action 方法,它是由主产品列表页面中的【Add Product】链接指定的方法。这将允许管理员向产品类别中添加新项目。添加创建新产品的能力将需要在应用程序中添加一个小的附加项。这是结构良好的 MVC 应用程序的一个很好的例子。首先,将Create方法添加到 Admin 控制器,如清单11-19所示。
清单 11-19:Controllers 文件夹下的 AdminController.cs 文件,添加 Create Action
using Microsoft.AspNetCore.Mvc;
using SportsStore.Models;
using System.Linq;

namespace SportsStore.Controllers
{
    public class AdminController : Controller
    {
        private IProductRepository repository;
        public AdminController(IProductRepository repo)
        {
            repository = repo;
        }

        public ViewResult Index() => View(repository.Products);

        public ViewResult Edit(int productId) =>
            View(repository.Products
                .FirstOrDefault(p => p.ProductID == productId));

        [HttpPost]
        public IActionResult Edit(Product product)
        {
            if (ModelState.IsValid)
            {
                repository.SaveProduct(product);
                TempData["message"] = $"{product.Name} has been saved";
                return RedirectToAction("Index");
            }
            else
            {
                // there is something wrong with the data values
                return View(product);
            }
        }

        public ViewResult Create() => View("Edit", new Product());
    }
}
Create方法不渲染其默认视图。相反,它指定应该使用 Edit 视图。一个 action 方法使用经常与另一个视图相关联的视图是完全可以接受的。在这种情况下,我提供一个新的Product对象作为视图模型,这样 Edit 视图就可以填充空字段。
注意:我没有为此 action 方法添加单元测试。这样做只会测试 ASP.NET Core MVC 处理 action 方法结果的能力,这是您认为理所当然的事情。(除非您怀疑存在缺陷,否则通常不会为框架特性编写测试。)
这是唯一需要的更改,因为Edit action 方法已经设置为从模型绑定系统接收Product对象并将它们存储在数据库中。您可以通过启动应用程序、导航到 /Admin/Index,单击【Add Product】按钮以及填充和提交表单来测试此功能。您在表单中指定的详细信息将用于在数据库中创建一个新产品,然后显示在列表中,如图11-7所示。
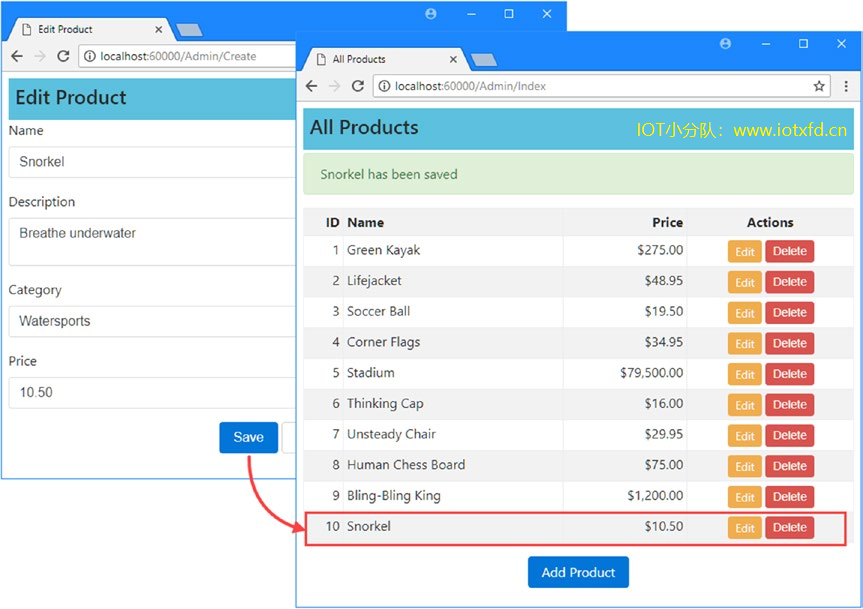 图11-7 编辑产品时的数据验证
添加对删除项的支持也很简单。第一步是向IProductRepository接口添加一个新方法,如清单11-20所示。
清单 11-20:Models 文件夹下的 IProductRepository.cs 文件,添加删除产品的方法
using System.Linq;

namespace SportsStore.Models
{
    public interface IProductRepository
    {
        IQueryable<Product> Products { get; }
        void SaveProduct(Product product);
        Product DeleteProduct(int productID);
    }
}
接下来,我在 Entity Framework Core 存储库类EFProductRepository中实现这个方法,如清单11-21所示。
清单 11-21:Models 文件夹下的 EFProductRepository.cs 文件,实现删除支持
using System.Collections.Generic;
using System.Linq;

namespace SportsStore.Models
{
    public class EFProductRepository : IProductRepository
    {
        private ApplicationDbContext context;
        public EFProductRepository(ApplicationDbContext ctx)
        {
            context = ctx;
        }
        public IQueryable<Product> Products => context.Products;

        public void SaveProduct(Product product)
        {
            if (product.ProductID == 0)
            {
                context.Products.Add(product);
            }
            else
            {
                Product dbEntry = context.Products
                    .FirstOrDefault(p => p.ProductID == product.ProductID);
                if (dbEntry != null)
                {
                    dbEntry.Name = product.Name;
                    dbEntry.Description = product.Description;
                    dbEntry.Price = product.Price;
                    dbEntry.Category = product.Category;
                }
            }
            context.SaveChanges();
        }

        public Product DeleteProduct(int productID)
        {
            Product dbEntry = context.Products
                .FirstOrDefault(p => p.ProductID == productID);
            if (dbEntry != null)
            {
                context.Products.Remove(dbEntry);
                context.SaveChanges();
            }
            return dbEntry;
        }
    }
}
最后一步是在 Admin 控制器中实现Delete action 方法。此 action 方法只支持 POST 请求,因为删除对象不是幂等操作。正如我在第16章中解释的那样,浏览器和缓存可以在没有用户明确同意的情况下自由地发出 GET 请求,所以我必须小心避免由于 GET 请求而进行更改。清单11-22显示了新的 action 方法。
清单 11-22:Controllers 文件夹下的 AdminController.cs 文件,添加 Delete Action 方法
using Microsoft.AspNetCore.Mvc;
using SportsStore.Models;
using System.Linq;

namespace SportsStore.Controllers
{
    public class AdminController : Controller
    {
        private IProductRepository repository;
        public AdminController(IProductRepository repo)
        {
            repository = repo;
        }

        public ViewResult Index() => View(repository.Products);

        public ViewResult Edit(int productId) =>
            View(repository.Products
                .FirstOrDefault(p => p.ProductID == productId));

        [HttpPost]
        public IActionResult Edit(Product product)
        {
            if (ModelState.IsValid)
            {
                repository.SaveProduct(product);
                TempData["message"] = $"{product.Name} has been saved";
                return RedirectToAction("Index");
            }
            else
            {
                // there is something wrong with the data values
                return View(product);
            }
        }

        public ViewResult Create() => View("Edit", new Product());

        [HttpPost]
        public IActionResult Delete(int productId)
        {
            Product deletedProduct = repository.DeleteProduct(productId);
            if (deletedProduct != null)
            {
                TempData["message"] = $"{deletedProduct.Name} was deleted";
            }
            return RedirectToAction("Index");
        }
    }
}
单元测试:删除产品
我想测试
Deleteaction 方法的基本行为,即当一个有效的ProductID作为参数传递时,action 方法调用存储库的DeleteProduct方法,并传递要删除的正确的ProductID值。下面是我添加到 AdminControllerTests.cs 文件中的测试:
...
[Fact]
public void Can_Delete_Valid_Products()
{
    // Arrange - create a Product
    Product prod = new Product { ProductID = 2, Name = "Test" };
    // Arrange - create the mock repository
    Mock<IProductRepository> mock = new Mock<IProductRepository>();
    mock.Setup(m => m.Products).Returns(new Product[] {
        new Product {ProductID = 1, Name = "P1"},
        prod,
        new Product {ProductID = 3, Name = "P3"},
    }.AsQueryable<Product>());

    // Arrange - create the controller
    AdminController target = new AdminController(mock.Object);

    // Act - delete the product
    target.Delete(prod.ProductID);

    // Assert - ensure that the repository delete method was
    // called with the correct Product
    mock.Verify(m => m.DeleteProduct(prod.ProductID));
}
...
您可以通过启动应用程序、导航到 /Admin/Index 并单击产品列表页面中的一个【Delete】按钮来查看删除功能,如图11-8所示。如图所示,当产品从目录中删除时,我已经利用TempData变量显示了一条消息。
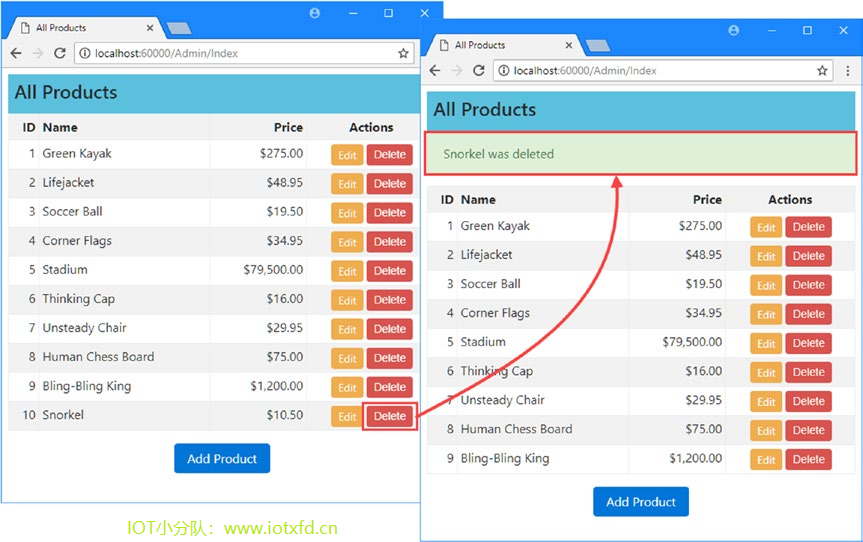 图11-8 从目录中删除一个产品
注意:如果删除以前为其创建了订单的产品,则会发现出现错误。当
Order对象存储在数据库中时,它被转换为数据库表中的一个条目,其中包含对与其关联的Product对象的引用,这被称为外键关系。这意味着,默认情况下,如果为产品创建了订单,数据库将不允许删除产品对象,因为这样做会在数据库中造成不一致。有许多方法可以解决这个问题,包括在删除与它们相关的产品时自动删除订单对象,或者更改产品和订单对象之间的关系。有关详细信息,请参阅 Entity Framework Core 文档。
在本章中,我介绍了管理功能,并向您展示了如何实现 CRUD 操作,这些操作允许管理员创建、读取、更新和删除存储库中的产品,并将订单标记为已发货的订单。在下一章中,我将向您展示如何保护管理功能,使其不为所有用户所用,我还将运动商店应用程序部署到生产中。
;